How do I purchase tickets with reserved seating?
![]() Updated
Updated
When an event has assigned (reserved) seating, you will often be asked to choose your specific seats from a seating chart or section-based map in addition to choosing your ticket type, such as VIP vs Standard or Child vs Adult.
Please Note: Not all Reserved Seating events will have a seating chart to choose from and may be sold as reserved by section or simply assign seating based on what is available. This is set by the venue or event promoter and cannot be changed.
Let's explore the process of purchasing tickets that have reserved seating.
Event Sales Page
- Performance Name
- Venue Name
- Performance Date and Time
- Doors Open Time (when applicable)
- Click to View Seating Chart (when applicable)
- More Information - click this to show the price of tickets as well as when the tickets when on sale.
- Performance Description - can include age limits, event information, etc.
- Seat Selection Methods display here. These can include a full Seating Chart with selectable sections, a per Section option, Best Available, purchasing by Price Level and more.
- Select the Section from the map by clicking.

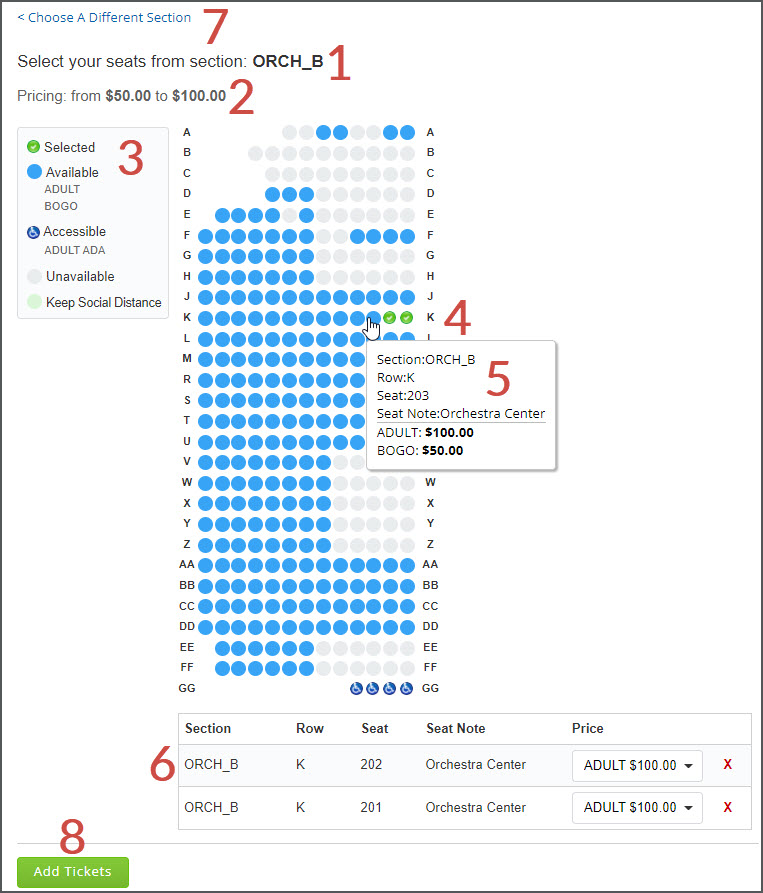
Selecting Seats
- Section Name.
- Price Range within Section.
- Seat Status Key - this key will tell you what seats are available (in blue by default), which seats you have already selected (in green) and more.
- Click to Select Seats.
- Hover over a seat to see the Section, Row, Seat, Seat Note, and Pricing.
- Chosen seats display here.If you have entered a promo code, check the drop down to ensure the discount is displayed as promos are often not automatically applied to chosen tickets.
- Click to Choose a Different Section.
- Click Add Tickets to continue to your shopping cart to purchase.
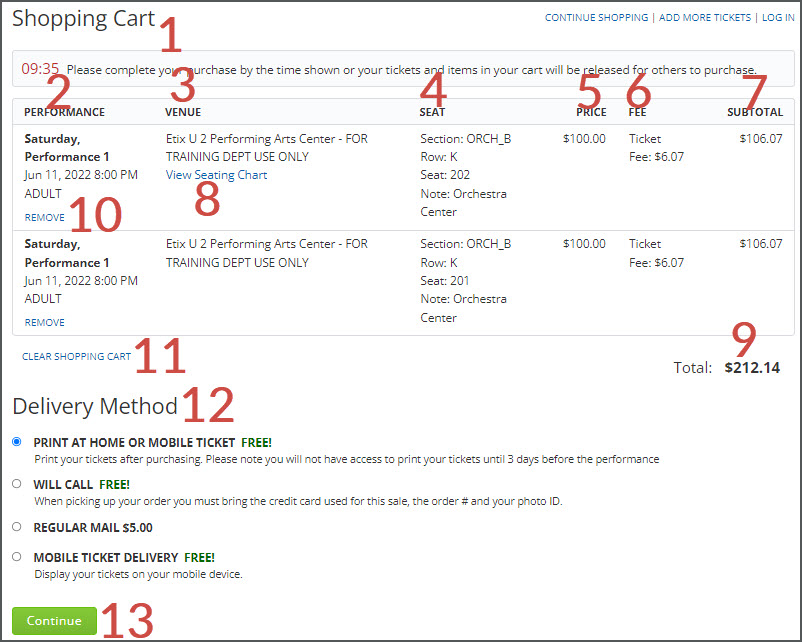
Shopping Cart
- Countdown Clock - to prevent tickets being held indefinitely, a variable countdown will begin as soon as this page is reached.
- Performance Name, Date and Time
- Venue Name
- Section, Row, Seat Number, and Seat Note (when applicable)
- Per Ticket Price
- Per Ticket Fee
- Ticket Subtotal - the total per ticket including fees.
- Click View Seating Chart to view a static map (when applicable).
- Ticket Total
- Click to Remove one ticket from your Cart.
- Click to Clear Shopping Cart entirely.
- Select a Delivery MethodSome venues have restrictions on their delivery methods according to your billing address zip code, so you may be required to enter your billing address zip code prior to selecting a delivery method. Please note: this will auto-populate your billing address zip code to the checkout screen and it cannot be changed.
- Click Continue to begin the check out process.
Secure Checkout Page
- Any Delivery Method Fee.
- Any Order Fee.
- Order Total - Total cost charged to you, including all taxes and fees (when applicable).
- Click to Continue Shopping. This will bring you back to the venue's performance list so you can purchase tickets for additional shows on the same order, if you wish.
- Click to Add More Tickets.
- Click to View Shopping Cart.
- Input your Billing Address.Many failed purchase attempts are due to incorrect billing information being provided at purchase. Be sure you're entering the billing address associated with the credit card you are using at checkout. Please note: Visa/Mastercard reloadable gift cards may require the purchaser to register the card for online purchases by selecting a billing address through the gift card website.
- Input your Payment Information.If you select Allianz ticket insurance during the checkout process, the ability to pay with Apple Pay is removed.
- Click to Agree to Terms & Conditions.
- Click Purchase.

After the purchase has been successful, you will receive a confirmation email to the address provided during checkout. You're all set to enjoy the show!